Category Archives: Questions and Answers

Error 509 – What to do when you see your website has “Bandwidth Limit Exceeded.” and how to fix it

Error 509 - What to do when you see your website has “Bandwidth Limit Exceeded.” and how to fix it
bandwidth-limit-exceeded-509-error

Error 509 – What to do when you see your website has “Bandwidth Limit Exceeded.” and how to fix it


1. 509 Limited bandwidth error Case – a common start-up online business mistake

You have build a large website with many pages and you receive a few thousands of visitors daily each page with some of the best Search Engine indexed pages to Google.com / Yandex.com / Bing.com etc. getting a more than 3000 unique visits (a month), you have a well written and have arrangements with few custom affiliate ads netowrk and your web data content already well SEO optimized for top keywords and showing in head positions in people searches on the net.

However your overall website is still not getting more than 150 000 to 200 000 visits a month which and the site is not so big still to host it on your own hired dedicated server hosting but situated on a relatively cheap shared hosting and you have a limited web hosting plan because you want to maximize the earnings made from website and minimize the costs (as it is common for most Start-up website hosted businesses). After all you and the hired programmer / and support guy have to live on the the earnings you make from the website.

Everything works great and you’re happy the business is growing month by month and website Rank gets and Visitors are increase leading to improving affiliate payment check – (financial results).

But wait suddenly a colleague friend of yours you developed together the website platform that generates you money
calls out and tells you when he faced interruptions with website and gets in his Chrome Web browser sudden unexpected Error 509 – Bandwidth Limit Exceeded errors as he was working inside the website (admin) web panel moving (renaming) website categories to put a better order of shared blogs user data.

Of course as your website is build by a developers you hired and you might be not an IT person, the website makes its money using business processes logic and you as a CEO Manager did not have a in depth perspective on the technologies so you did not have idea originally what the Error 509 – Bandiwidth Limit Exceeded message means at all so you do a quick research online and quickly realize the Error 509 status error is caused by your Web hosting provider and the relatively cheap Limited Hosting plan you choose to use in order to cut the hosting budget expenses.

The first logical reaction is to get angry at the Web Hosting Provider that they failed to inform you timely that your reserved account Data Receive / Send bandwidth is exceeding, you might even call the Web Hosting Service Provider (SP) and scream them a little bit that they failed to warm you timely about the upcoming bandwidth exceeding, just to understand you missed the email sent by them because you thought it is some non-important Marketing “SPAM” aimed to make you Increase Hosting Plans and take your money for nothing.

Well anyways that won’t make situation better, until you pay for raising your hosting plan.
For those curious, the reason the 509 page error came true is because the Hosting SP entered a Firewall (Shaper) rules on their traffic shaping Network (Cisco) routers and automatic page was placed via a automated script that does run a mod_rewrite if Apache, NGINX, Lighttpd URL rewrite rule to rewrite all your received URL addresses (that point to your IP or Ips of your (Web hosting) VPS to a simple 509 error return page

As you pay for a hosting plan where your Bandwidth Limitations are set on montlly basis (principle) and your preset amount of bandwidth to make the website display again you have to pay the Hosting SP Company for a Higher Limit Bandwidth or no Limit Bandwidth (which would be best and will prevent your business from future 509 error issues)

2. So what is really a Bandwidth ?

To get you better understand the problem let me explain shortly what is bandwidth since it can mean a multiple things in general.

1. Bandwidth might be a limitation on the maximum speed Download / Upload data information speed (rate) your website can be accessed with.
Information is transferred in computer terms generally in Bytes / Kilobytes / Megabytes / Gigabytes and Terrabytes.
a) High Download speed limitation is required if your website needs to be fast in downloading files, that is the case if your website has a lot of files and its users regularly tend to download from it.

b) Your upload speed needs to be high if your website gets a lot of traffic of Upload type (e.g. many people are uploading data to your website) – an example for high Upload need website is for example Google Drive service which is configured to receive data with a very high Upload limitation.

c) Bandwidth term could also stand about the maximum amount of data transferred at a certain interval of time (lets say your Hosting Providers might allow you to Download / Upload 10 Gigabytes daily a day hiring a Bandwidth amount is common especially at the Age of Cloud computing we are entering lately, where it is common for a Web Hosting user to hire assign for a certain bandwidth resource according to its needs.

Bandwidth being exceeded is common when you have a sudden increase in amount of up / down data traffic your website experiences due to improved reachability from Organic Searches in Search Engines or because an important link to your website provided (software product) has become Viral on the Internet being posted on some huge group on Facebook / Twitter / Pinterest etc.
The increased amount of high visitors website registration upload / download (data share) might push your website to reach the bandwidth capacity (lets say 500 Gigabytes a month) and then your hosting provider automated shaper might start showing up your clients the annoying 509 web server error code.

3. Solution to Bandwidth Limit Exceeded error

You have your hosting profile (max amount of data that can be transferred) and since the Limited access to your website could damage severely your web presence the issue has to be solved in a shortest term possible as every second and minute of downtime to your website might ruin your website reputation both for Search Engines (website SEO) and for end users which take advantage of your website content data, that’s especially sure if your website is unreacable due to the error for 1 or more hours. If the inaccessibility to website continues for too long (lets say a week) without being tracked that might even make some of the pages or the whole website being temporary delisted from Search Engines, thus the issue has to be solved in a matter of minutes to hours …

To do so just use your Web Hosting provider account provided management interface and do pay for a Hosting plan upgrade that switches you to Unlimited Bandwidth hosting plan (if such is present from HP) or even better change your account plan to Unlimited Profile Account (where you will get unlimited amount of disk space, CPU time and bandwidth.

Shared hosting plans on Amazon Web Services, OVH, Hostgator, BluehostOvh.com had shared hosting plans offering unmettered (unlmited) bandwidth of course that unlimited is not really unlimited, it just means the limitations of maximum bandwidth traffic tube you get is so high it is mostly unlikely you will ever reach it except if you are not running in innovation Video sharing service that is to be a direct concurrency to websites such as Youtube.com or Vimeo. Most of websites however are of small or mid-sized scales and never match a traffic limitation more than some 100Gb to half a Terabyte monthly.

For users hiring a VPS server instead of simple Data web hosting control panel such as cPanel, ISPManager, Kloxo Virtual Min etc. there is usually a way to dynamically choose the exact amount of resources you plan your website to have (based on your quick website scaling research).

4. Counting how much Bandwidth you need (quick tips)?

Projecting your web site bandwidth plan is a task whose success depends heavily on proper evaluation on some website statistics directly on VPS (if you have one) or measuring statistics tools log tools Awstats, Webalizer etc. and other Web ones such as Google Analytics.

The rule of thumb to prevent yourself from 509 Bandwith Limitation errors is to better choose a a hosting plan that is much higher (over-sized) than planned expectations than to go with a one that is fixated on too much realistic data but severely down-sized.

Here are few tips on how to do an adequate decision on how much bandwidth (what kind of hosting plan) its best to purchase for your Site.

* Read unique Visits hourly, daily monthly statistics, read as many and differentiated channel Website access (Visit) statistics as you could!
Also read statistics for more prolonged intervals of times, last 6 months statistics and checking last 1 year statistics (if your website is up for that time already) is a very good practice to help you understand more about your website.

* Use a small shell / perl script to define the biggest and smallest downloadable files and pages on your site (that are most often accessed) – The script could parse Web server access log files and generate some predefined criteria statistics.

* Understand approximate number of pageviews a unique visitor does to your site

* Always purchase at least 2 to 4 times more bandwidth than site actually use monthly

* Check out regularly at least 2 to 4 times a week for any notifications / warning / error messages inside the provided Shared Hosting provider interface.

* Never ever skip to read emails delivered from your Hosting Provider (make the habit to move such emails into a separate folder under your webmail (you can create a simple email filter to
* If your website is running on Linux VPS server use something as vnstat tool to determine the I/O network statistics that flow to your Virtual Network Card Interface.

always move emails from Hosting Provider to a separate email directory for the goal, that way you might miss up the HP emails, between the tons of other work emails you get just because you thought of reading the email but forget too).
An useful tool that can help you to Calculate the right amount of bandwidth is Bandwidth calculator

You can also try to use a sample required Bandwidth formula such as:

Alleged hosting bandwidth required (AHBR) = Avarage Number of pageviews (ANP) [ multipled by] Avarage Accessed Page Size (AACP) [ multiplied by] Avarage Number of daily visitors

Written in a more comprehensible form the Bandwidth Limitation (calculate) is:

AHRB = ANP x AACP x ANDV

Of course there are many other factors to consider for your webserver to achieve maximum Bandwidth performance. For example if your website is targetting the American E-market, its best practice to choose as a hosting provider an American for example NameCheap or iPage , since your website is mostly going to be visited by America continent (Americans, Canadians, Mexicans, Brazilians, Columbians etc.)., doing so would make the Internet backbone internet traffic routed through American Internet Provider servers and will impact the bandwidth performance drastically.

Another good idea if you want to prevent your site partially from Bandwidth Limit 509 error is to configure the site’s hostname (DNS records) to to point to Cloudflare CND.

That would make your web hosting website provider webserver IP to not be directly visible by a simple DNS requests (automatically done by browser once you type the URL of your site in it) instead when your Domain-Name-URL.com gets resolved you will end up seeing the CDN configured to use Cloudflare external IPs which does redirect to your website besides that CloudFlare provides Server Load Balancing and will prevent your website from many of the automated script hacking attempts as well as Denial of Service (DdoS) attacks.

5. End up Summary

509 server errors would cost you money and time to recover your online business harms, hence you always try to make a proper site scaling in advance so you never with site down due to it.
As a best practice whether you can financially afford it invest in non limited bandwidth hosting!.
The extra money that you will spend will usually return back multipled and would be better than harming your website online image by ending looking to your customers like unprofessional.

I hope this article enlightened what stands behind the Bandwidth term and gave you a better understanding on why the 509 Bandwidth error message appeared and give you some general suggestions on how to prevent it.
Reverting Malwarebytes from Free Trial Expired to Free Malwarebytes howto

malware-bytes-revert-to-free-end-free-trial-recover-from-expired-trial-purchase-to-free-to-protect-your-pc-from-spyware

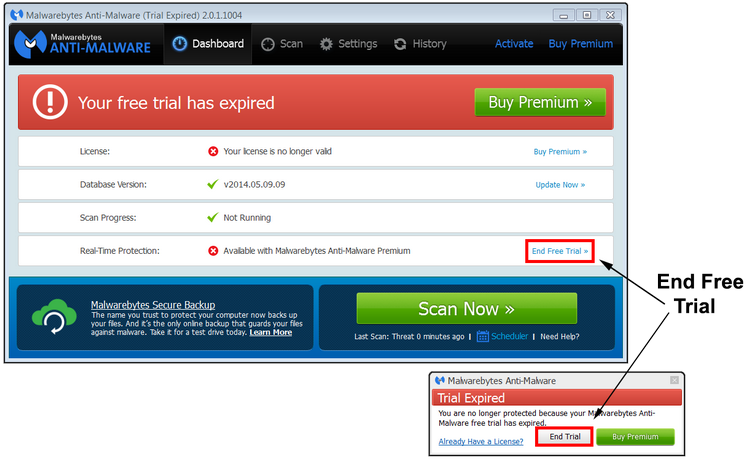
Note: When the evaluation period was over, you’ll get a popup or notification, conveying message ‘Trial expired, You are no longer protected because Malwarebytes Anti-Malware free Trial has expired’, you’ll be presented with options to ‘End Trial’ and ‘Buy Premium’.
That’s pretty annoying especially as Malware Bytes is a real anti-spyware diamond software that worths to be ran every now and then to keep your PC protected from ever increasing terrible spyware malware and ransomeware.

Thanksfully it is rather easy to fix that and revert back to Malwarebytes Free Trial.

Open Malwarebytes, and on the Dashboard, click on ‘Malwarebytess or End Free Trial’, the message here does vary according to the version you have. Then will be instantly converted to the free version.

Whose wordpress related posts plugin is fastest – WordPress Related Posts plugins Performance Tests and switching from Zemanta WordPress Plugin to Contextual Related Posts

wordpress-reduce-sql-queries-with-best-wordpress-related-posts-plugin

Since some time I’ve noticed one of my blog wordpress plugins (Zemanta WordPress Related Posts at pc-freak.net/blog is causing a serious mysql overhead, the plugin simply created too many SQL requests to the mysql server causing each client to the blog to cause an useless overhead. I’ve done a quick search whether this Zemanta propertiery (plugin) was slow and I ended up a nice article
calledRelated Posts Plugins performace – measured

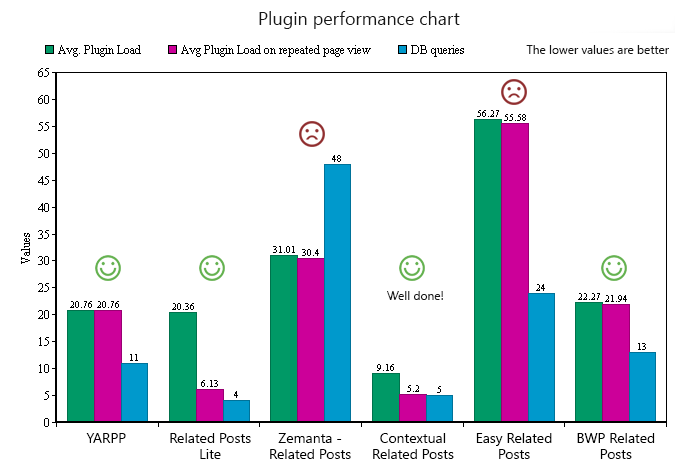
The article compares the most popular used plugins to show Related Posts at the end of a WordPress Posted Page:

Speed Analysis was made withusing P3 Performance Profiler wordpress plugin which is outstanding one to use for anyone who want to debug what and how efficient is a wordpress install.

Tests were performed to following Related Posts plugin which more or less are doing the same (though some have some more options than others)

For the output were picked two very important calculations.

  • The overall average plugin load time, relative to the core load time
  • The average plugin load time after the initial hit (thus after the first page load)

performance-chart-comparison-between-most-related-posts-plugins-yarpp-related-posts-lite-zemante-related-posts-easy-related-posts-bwp-related-posts

All values are in per cents, indicating how much of the page load time is taken by the plugins – the lower the better.

The picture clearly shows that most efficient plugin with approximate best results is Contextual Related Posts. Seing that I’ve immediately disabled Zemnta Related Posts and switched to Contextual Related Posts. Once Contextual Related posts is enabled, to configure it I just had to tune few things (I set 8 related posts to show) and enabled related posts to show in the Feed. That’s it now my machine can perform better without Zemanta stoining mySQL.
I’ve given YARPP a test too and it works quite well but it is a little bit slower than CRP.
Well that’s all folks, before switching from Zemnta don’t just trust this statistics but try it yourself.
Happy testing ! 🙂

Google chrome install crx howto – Installing chrome plugin (exntensions) manually

https://pc-freak.net/images/google-chrome-install-crx-format-plugins-manually-howto
I’ve recently had to install Google Chrome on old already unsupported Ubuntu 10.10 Linux release, after a long search I come across an old deb packages of Chrome that works on Ubuntu 10.10.
So far so good now Ubuntu had Chrome, but there was not the basic (must have) extension support of Adblock Plus (disabling website advertisements) which I usually install on any Fresh (new) installed Linux / Windows desktop customer.

This is done pretty simple you have to Open Chrome Browser extension Interface:

(Go to Right corner 3 Dashes) Tools menu -> Settings -> Extensions

Or if you prefer to do it manually with a command like me type in URL address bar:

chrome://chrome/extensions/

Usually plugin files for Chrome that are installable comes in Custom-Plugin-namer.JS or Whatever-plugin-name.CRX.

Next take the plugin (from any folder it is located or right from Chrome’s download folder or wherever the plugin you want to install that is not otherwise available via Chrome Web Store and
(drag and drop) – place it into Extensions opened window.

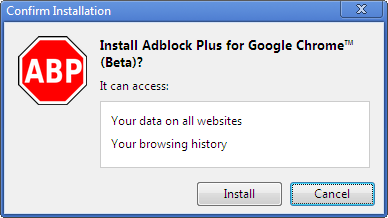
You’ll be prompted to confirm installation of the extension, just as if you had installed it from the Chrome Web Store.

Adblock-Plus-for-Google-Chrome-install-plugin-yes-or-no-prompt-screenshot-linux-windows-macos

This will make the plugin install or ask you few questions to approve the installation. The custom Adblock (old version) which I used to install successfully is located here. I’ve tried installing also some other Adblock+ versions from ABS developers site but the versions provided there was too new and failed to install.

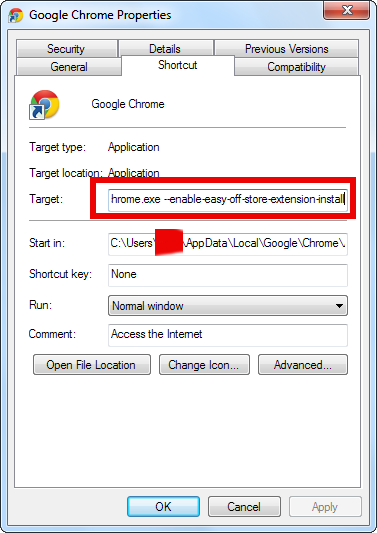
If you don’t want to be in future bothered with annoying “Do you want to install plugin?” prompt you can configure Chrome to start each time with an option:

–enable-easy-off-store-extension-install

configure-chrome-to-always-install-plugins-without-confirmation-prompt-chrome-properties-windows-os-screenshot

Web Wedevelopment basics – What is REST (Representational state transfer) and why it is important to programming?

web-development-basics-what-is-rest-protocol-used-to-communicate-server-client-via-http-rest-service-import-to-programming

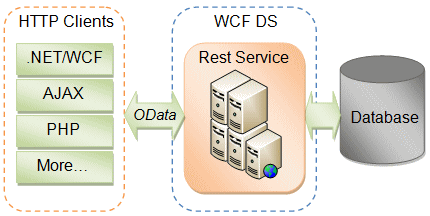
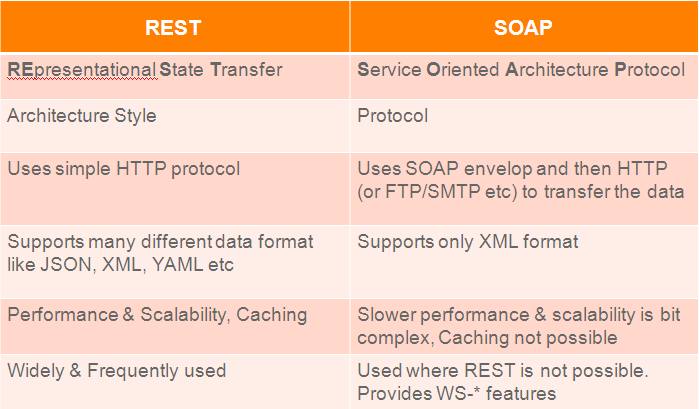
Representational State Transfer (REST) has gained widespread acceptance across the Web as a simpler alternative to SOAP and WSDL based Web services. In layman’s terms, REST is an architecture style or design pattern used as a set of guidelines for creating web services which allow anything connected to a network (web servers, private intranets, smartphones, fitness bands, banking systems, traffic cameras, televisions etc.) to communicate with one another via a shared common common communications protocols known as HyperText Transfer Protocol (HTTP). The same HTTP Verbs (GET, POST, PUT, DELETE etc.) used by web browsers to retrieve and display web pages, audio/video files, images etc. from remote servers and post data back to them when performing actions like filling out and submitting forms are used by all of the aforementioned devices/services to communicate with one another.

rest-vs-soap-web-data-transfer-protocols
By leveraging and repurposing a lightweight and universal protocol like HTTP, software engineers and system architects are given a set of guidelines to use when designing RESTful web services for both new and existing products and services that contribute to what has become collectively known as the Internet of Things (IoT).

A simple example of designing a web service for managing employee data using an OData REST implementation might involve several methods, each corresponding to one of the HTTP verbs. A method like “Employees/GetEmployees” would be mapped to the GET verb (or “Employees/GetEmployee/12345” in the case of retrieving details for a single specific employee), handling all requests submitted to the web service, “Employees/AddEmployee” would be mapped to the POST verb, “Employees/UpdateEmployee” would be mapped to PUT and “Employees/DeleteEmployee” would be mapped to the DELETE verb. If the service were also exposing an interface to allow remote clients to manage consumer products the API would follow a similar naming convention but obviously specific to consumer products (i.e. Products/GetProducts, Products/AddProduct etc.). Any remote client that has access and is authorized to use any of these methods would be able to execute them provided that the remote client is capable of sending and receiving data using the HTTP protocol.

Technically speaking, it is an abstraction of the architecture of the World Wide Web (WWW); more precisely, REST is an architectural style consisting of a coordinated set of architectural constraints applied to components, connectors, and data elements, within a distributedhypermedia system. REST ignores the details of component implementation and protocol syntax in order to focus on the roles of components, the constraints upon their interaction with other components, and their interpretation of significant data elements.

The REST architectural style is also applied to the development of web services. One can characterize web services as “RESTful” if they conform to the constraints described in the architectural constraints section. RESTful web services are assumed to return data in XML and/or JSON format, the latter of which has been gaining more and more support and seems to be the data format of choice for many of the newer REST implementations.

Source of info: Wikipedia

How to check and change linkedin username Link – Change linkedin personal profile URL

view-and-change-your-url-leading-to-profile-howto

If you need to integrate your Linkedin profile username into some online social sharing blog or website it is useful to change the URL address of the profile. You will need url to paste it there.

You can customize your public profile URL when you edit your public profile. Custom public profile URLs are available on a first come, first served basis.

  1. Move your cursor over Profileat the top of your homepage and select Edit Profile. It will be an address like “www.linkedin.com/in/yourname”.
  2. Click Editnext to the URL under your profile photo.
  3. In the Your public profile URLbox in the bottom right, click “Customize your public profile URL”.
  4. Type the last part of your new custom URL in the text box.
  5. Click Set Custom URL.

Notes:

  • Your custom URL can have between 5 – 30 letters or numbers. Don’t use spaces, symbols, or special characters.
  • If the URL you want isn’t available, please select a different one. We can’t make custom URLs available to other members upon request.

More information about URLs:

  • You can change your URL up to 5 times within 180 days.
  • If a member uses a URL and then changes it, the URL will be unavailable for use by other members for 180 days.My linkedin username after changing is
    http://bg.linkedin.com/in/georgihipo


Get your google plus url easy guide – how to get link of your Google+ profile url (User ID)

Google_plus-icon_-300x300
Get your Google+ URL is very easy however the description given by Google’s answers site on how to get google plus URL is obscure and very user unfriendly (in my opinion).
If you’re wondering why on earth would you ever need this URL, some useful place where you might need it is whether you’re a blogger like me and you need to link your blogspot or custom wordpress account with your google+ or you want it to link any other social network like Linkedin or Facebook to your Goo+

Below is a 3 steps guide to follow to get your Google+ account URL. The URL is not user friendly so you might also want to create a custom URL like:
plus.google.com/your_custom_link

1) Log in to Google+

2) Click on the this link or manually go to URL address http://plus.google.com/me

3) Look at the URL in the address bar, it should look something like this:

https://plus.google.com/112967367947674343110/posts

4) That is your Google+ URL!

Howto add adsense advertisements to your StatusNet micro blogging social Network

howto-add-adsense-to-statusnet-social-network-free-twitter-like-service
If you’re running your own statusnet micro blogging network and you happen to have a lot of content inside which you want to monetarize, sooner or later you will think of embedding Google Adsense advertisements to StatusNet.

I’ve found few discussions online like the thread on statusnet forums.
However there is no clear tutorial online yet explaining how to add adsense to statusnet, therefore, I decided to write this little guide.

Luckily StatusNet has a special Adsense Plugin enabling you to include adsense advertisements into your statusnet.

To enable advertising, you must sign up with Google Adsense and get a client ID.

https://www.google.com/adsense/

You’ll also need to create an Adsense for Content unit in one
of the four sizes described above. At the end of the process,
note the “google_ad_client” and “google_ad_slot” values in the
resultant Javascript.

If you’re a programmer check out StatusNet Adsense Plugin code in

/var/www/statusnet/plugins/Adsense/AdsensePlugin.php

Even if you’re not a programmer it is quite easy to add new Adsense sizes, however you have to be sure the new size placement in browser will show correctly.

The way to enable / use the plugin is to add in your /var/www/statusnet/config.php

line:

addPlugin(‘Adsense’, array(‘client’ => ‘ca-pub-6964339082113074’, ‘rectangle’ => ‘2824360868’));

The general Syntax of addPlugin(); is

addPlugin(‘Adsense’, array(‘client’ => ‘Your client ID’, ‘rectangle’ => ‘slot’));

Where client should be your adsense code google_ad_client,

rectangle field could be one of the values:

‘mediumRectangle’, ‘rectangle’, ‘leaderboard’, ‘wideSkyscraper’

Each of this values should be selected based on the width and size of the Google Adsense Ads to be shown.

Here are the general sizes:

MediumRectangle – To show Ads sized width 300 height 250 (300×250)

rectangle – 180×150

wideSkyscaper – 160×600

Leaderboard – heigh x width ( 728 x 90 )

Note that:
Some StatusNet themes might interact quite poorly with this plugin.

It could take some time until ads start appearing on page as after generation in adsense to make it working it takes up to 10 / 15 minutes for it to become active

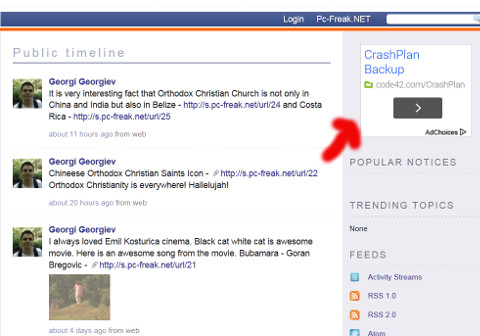
Once config.php is saved check out, whether Adsense advertisements will appear in the left top of your StatusNet, right below the Search field, like on below screenshot.

adsense-advertisements-on-my-statusnet-social-network-howto

If it doesn’t appear there and you have the code embedded scroll down to StatusNet and check out whether adsense ads are not partially visualized (this sometimes happens if you try to insert adsense code with dimensions bigger than the size of its right pane, if that’s the case you should see your Ads visualize somewhere on the bottom left of page.

Well that’s all, hopefully if your statusnet gets a good traffic and is frequently updated you will start making money with adsense.

How to add Google Adsense to BuddyPress WordPress?

howto-add-adsense-to-buddypress-and-wordpress-without-plugin

If you have installed Multi-site BuddyPress or WordPress you can easily add adsense advertisements and there is no need to use any plugin or anything to add Adsense ads to Widgets.

This site itself is running BuddyPress and my quick research on plugin to use to add Adsense ads just led me to various suggestions plenty of different approaches like:


None of this however doesn’t seemed to work for me until finally I found this post pointing out that it is possible to use embedded WordPress Widgets to add the required code to WordPress.

I’ve tested and it seems, the Widget using Method to inject advertisements into your BuddyPress social network works perflectly fine.

Here is how to add Adsense to BuddyPress

1.

Login with adminsitrator to wp-admin or whatever URL you put for admin

2.

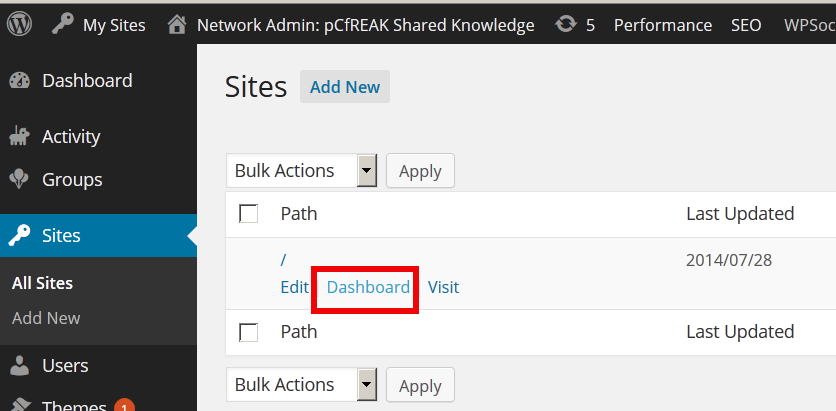
sites-all-sites-dashboard-add-adsense-to-buddypress-wordpress-screenshot

Sites -> All Sites -> Dashboard

3.

On the next page to display go to

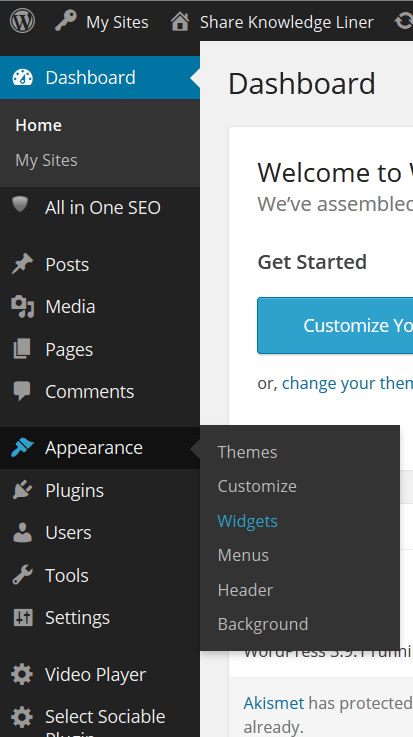
add-appearance-widget-in-buddypress-add-adsense-code-in-widget-wordpress-buddypress

Appearance -> Widgets

4.

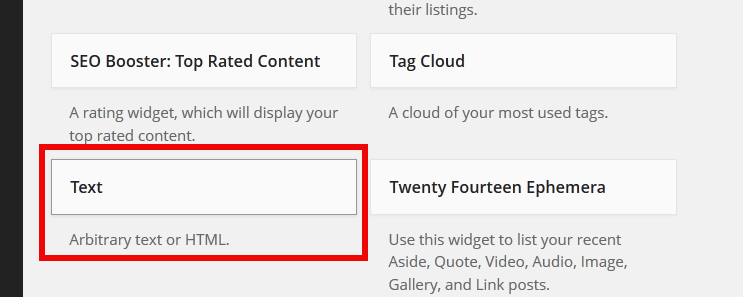
On this page Drag and Drop

Text Widget

(Hold on Text Widget with mouse button and drag to ordered list of Widgets to show on page)

add-text-to-widget-add-adsense-code-to-buddypress-and-wordperss-howto-pic

5.

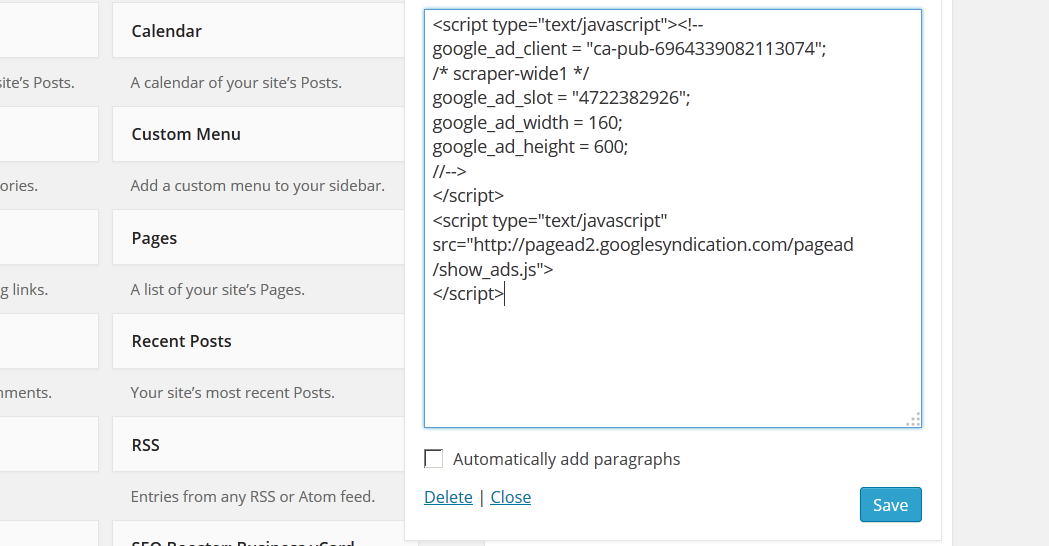
Add a title to the newly added Text field to Widgets (lets say just type Ads)

And then paste the generated from Google Adsense interface Google Adsense code:

howto-add-adsense-tobuddypress-wordpress-installation-easy-without-plugin

Then press the Save button to save the Widget and if you need drag and drop between the available Widgets to change the exact place where Adsense Ads will appear.

That’s all give thanks to The Lord Jesus Christ for finding this post 🙂

Windows equivalent command of Linux lsof and fuser

What is Windows equivalent commanf of Linux lsof and fuser?

There is no direct equivalent except if you don’t install some port versions of lsof and fuser.
However Windows has a way to check which network resource is used by which command very much Like in Windows.
I would say netstat -ab is Windows command equivalent to Linux lsof and fuser.

Pretty cool to know!
C:\Tools\Putty>netstat -ab

Active Connections

Proto Local Address Foreign Address State
TCP 0.0.0.0:135 GGEORGI71:0 LISTENING
RpcSs
[svchost.exe]
TCP 0.0.0.0:445 GGEORGI71:0 LISTENING
Can not obtain ownership information
TCP 0.0.0.0:902 GGEORGI71:0 LISTENING
[vmware-authd.exe]
TCP 0.0.0.0:912 GGEORGI71:0 LISTENING
[vmware-authd.exe]
TCP 0.0.0.0:3460 GGEORGI71:0 LISTENING
[Radstgms.exe]
TCP 0.0.0.0:3465 GGEORGI71:0 LISTENING
[radexecd.exe]
TCP 0.0.0.0:6000 GGEORGI71:0 LISTENING
[XWin.exe]
TCP 0.0.0.0:8288 GGEORGI71:0 LISTENING
[FrameworkService.exe]
TCP 0.0.0.0:16386 GGEORGI71:0 LISTENING
[AgentService.exe]
TCP 0.0.0.0:22201 GGEORGI71:0 LISTENING
[svctimehpc.exe]
TCP 0.0.0.0:23443 GGEORGI71:0 LISTENING
[Ditto.exe]
TCP 0.0.0.0:49152 GGEORGI71:0 LISTENING
[wininit.exe]
TCP 0.0.0.0:49153 GGEORGI71:0 LISTENING
eventlog
[svchost.exe]
TCP 0.0.0.0:49154 GGEORGI71:0 LISTENING
Schedule
[svchost.exe]
TCP 0.0.0.0:49155 GGEORGI71:0 LISTENING
[lsass.exe]
TCP 0.0.0.0:49192 GGEORGI71:0 LISTENING
[services.exe]
TCP 127.0.0.1:5939 GGEORGI71:0 LISTENING
[TeamViewer_Service.exe]
TCP 127.0.0.1:16388 GGEORGI71:0 LISTENING
[Agent.exe]
TCP 127.0.0.1:49190 GGEORGI71:0 LISTENING
[DcaTray.exe]
TCP 127.0.0.1:55591 GGEORGI71:0 LISTENING
[XWin.exe]
TCP 127.0.0.1:55591 GGEORGI71:55592 ESTABLISHED
[XWin.exe]
TCP 127.0.0.1:55591 GGEORGI71:55593 ESTABLISHED
[XWin.exe]
TCP 127.0.0.1:55591 GGEORGI71:55594 ESTABLISHED
[XWin.exe]
TCP 127.0.0.1:55592 GGEORGI71:55591 ESTABLISHED
[XWin.exe]
TCP 127.0.0.1:55593 GGEORGI71:55591 ESTABLISHED
[XWin.exe]
TCP 127.0.0.1:55594 GGEORGI71:55591 ESTABLISHED
[XWin.exe]
TCP 127.0.0.1:59946 GGEORGI71:59948 ESTABLISHED
[firefox.exe]
TCP 127.0.0.1:59948 GGEORGI71:59946 ESTABLISHED
[firefox.exe]
TCP 192.168.0.102:139 GGEORGI71:0 LISTENING
Can not obtain ownership information


Cheers Mates 🙂