I’ve been fighting for the last 3 days with a very strange problem. Since some time after I’ve initiated 23 plugin updates of my WordPress based weblog pc-freak.net I’ve ended up with My Feedburner Subscribers button showing 0 Subscribers.
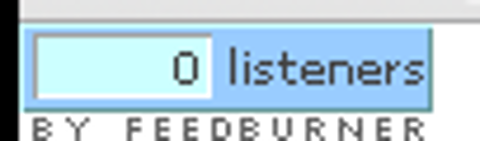
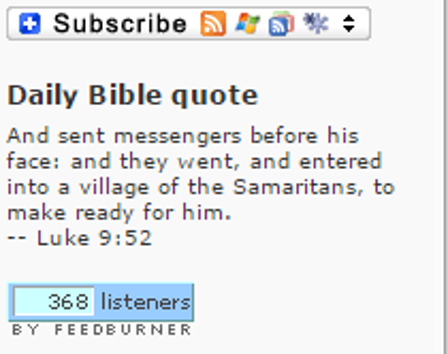
You can imagine how bad impression such a button makes to regular readers of a 0 blog readers. Before I ended up with this button it was showing 365 reades. Such a button those who subscribed for a blog feed could mean only one thing that the blog is useless and the flock effect of people unsubscribing is about to become shortly reality. Hence to prevent a bad SEO Impact from this button I had to urgently fix that !
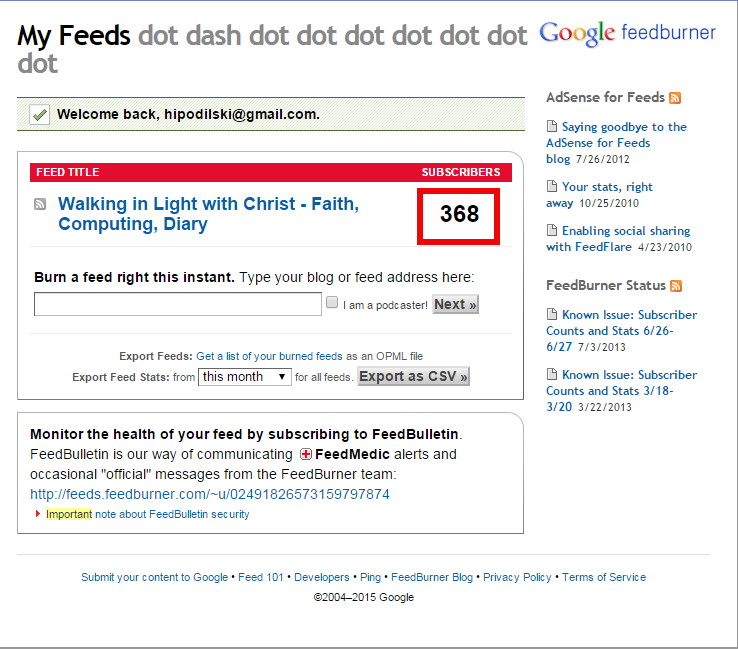
First thing which I did is to to login using my Google Account with which I’ve set-up the feed earlier and check whether I have really 0 subscriptions or it is just a bug from the image button.
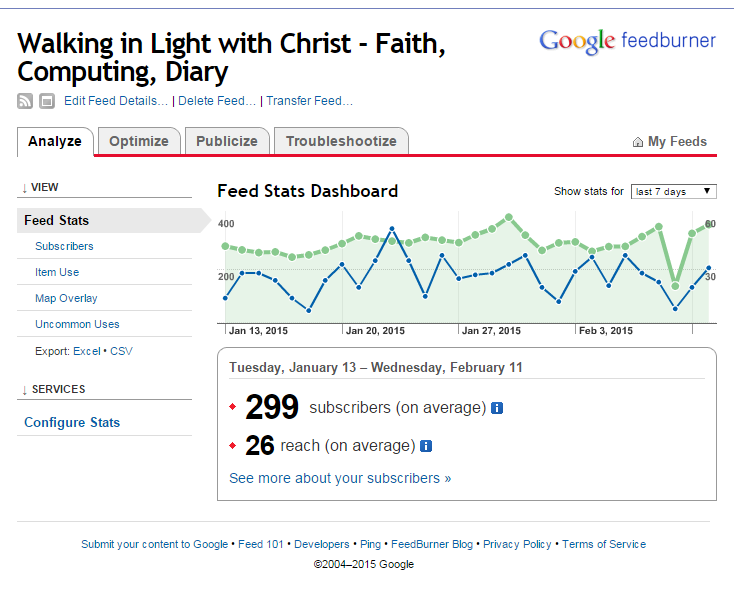
To see how many subscribers you have once you have logged into FeedBurner you have to go to:
PUBLICIZE -> FEEDCOUNT
I’ve spend many hours googling on the Feedburner issues just to found out such an errors is not news and even to understand FeedBurner used to be a separate company from Google before Google purchased it. So the problems this service is facing is an ancestry from the previous company.
There were multiple blog posts reporting about the same problem, many people who came up with their own solution such as this one feedburner CSS hack fix
I tried also using some alternative ways to show Total Feedburner Subscriber Count using XML / Curl / Regular Expressions or WordPress Plugin
There was also a good report describing the issue here – FeedBurner Subcriber Count Problem
I’ve also found this article giving some possible reasons why the counter of feedburner shows zero
From everything I red I understood the reason behind listeners in Google Feedburner to be 0 is often Google’s backend system, however I was not sure whether the problem I end up with is not caused by new enabled plugins I was suspecting the 0 subscriptions feed error might be caused by WP Author, Date and Meta Remover plugin – which is a cool plugin that wipes out all the annoying Author and Meta info that is set by plugin authors and just takes up space of the HTML / CSS / Javascript code
Other thing I tried is to not use code generated from Google Feedburner’s interface but instead use Feedburner stats wordpress plugin which is basicly doing the same thing but this doesn’t help either. That problem was really driving me crazy as it eat up at least one day from my life so finally after reading tons of posts online, I’ve learned that Enabled website caching also influences on how FeedBurner Counter button is displayed, thus I tried cleaning up W3 Total Cache’s Cache, Restarting the Apache server to make sure no caching is done on Apache level but guess what this didn’t solve it …
In the mean time while looking for a solution I stumbled upon a post saying that it is possible to manually hack the value of subscribers due to feedburner bug and tune your counter manually to approximately the subscribers count you used to have or if you want to play big traffic popular website just add some few thousand of listeners. I decided not to try the hack value of subscribers hack as I don’t want to break google policies and end up banned from Google and loose the small amount of money I make through Adsense monthly …
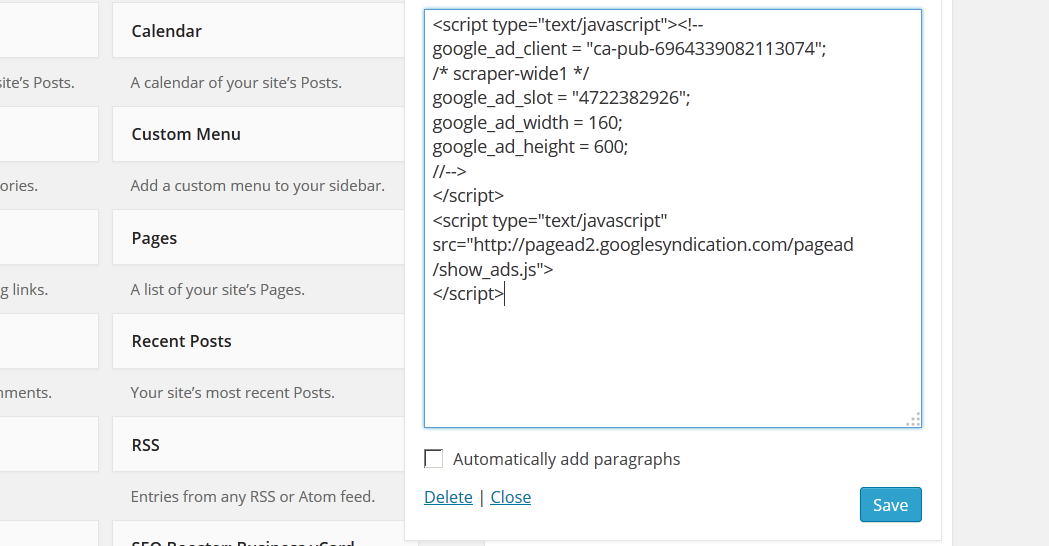
Finally after too much investigations and attempts to generate manually counter values with a PHP script I started trying to change values from the code form received from Google FeedBurner’s site (note to make here is this FeedCounter html code is on my WordPress Site Widgets – Appearance -> Widgets), e.g. the code issuing the 0 listeners picture was like this:
<p><a href=”http://feeds.feedburner.com/WalkingInLightWithChrist-FaithComputingDiary”><img src=”http://feeds.feedburner.com/~fc/WalkingInLightWithChrist-FaithComputingDiary?bg=99CCFF&fg=444444&anim=0&label=listeners=0″ height=”26″ width=”88″ style=”border:0″ alt=”” /></a></p>
I started manually changing values, in the code trying to remove the ~fc from above string but this didn’t help.
Finally after some deletes from the code and continuous refresh in Google Chrome browser it worked out!!!!!!!!
To make it work I’ve changed listeners value to be equal to 335.p><a href=”http://feeds.feedburner.com/WalkingInLightWithChrist-FaithComputingDiary”><img src=”http://feeds.feedburner.com/~fc/WalkingInLightWithChrist-FaithComputingDiary?bg=99CCFF&fg=444444&anim=0&label=listeners=335″ height=”26″ width=”88″ style=”border:0″ alt=”” /></a></p>
I’ve realied after that it doesn’t really matter whether I put listeners=335 or listeners=335000 because in reality webserver is diong some kind of ModRewrite rule rewriting the passed address to closest existing one.
I realized the fix was because trying to issue another URL i was getting the image resource not from a cache as I used to get it for 2 days but from unacached google location and this is the funny fix that took about 12 hours of debugging …
I hope this article will help someone else to save 12 hours of his life in useless website feedburned stats button debugging and spend it for reading something meaningful as the Holy Bible.
Thanks God its Solved!!!